> ## Documentation Index
> Fetch the complete documentation index at: https://docs.discord.com/llms.txt
> Use this file to discover all available pages before exploring further.
# Using Community Invites
> Automate role assignment and targeted invites using the Discord Community Invites API.
Community invites extend Discord's invite system with two API-powered features: the `role_ids` parameter for automatic role assignment, and the `target_users_file` parameter for restricting which users can accept an invite.
If you're a server admin or community manager looking to create role invites without code, see the [Community Invites guide](/developers/communities/guides/community-invites) for the Discord UI walkthrough.
This tutorial will walk you through using community invites programmatically in your bot or app. By the end, you'll know how to:
* Create invites that assign roles through the API
* Create targeted invites for specific groups of users through the API
***
## Understanding Community Invites Features
Community invites extend Discord's existing invite system with two powerful features designed for game integrations:
### Role Assignment
When using the API, the `role_ids` parameter lets you specify one or more Discord roles that will be automatically assigned when a player accepts the invite. No manual role management needed.
**Example use cases:**
* Giving roles to supporters
* Giving roles related to characters or achievements from your game
* Giving roles that have permissions to access channels
Once a user accepts an invite and receives the roles, those roles remain even after the invite expires or is deleted. You'll need to remove roles manually (via a bot or Discord's interface).
### Targeted Invites
Setting which users that are allowed to accept an invite can only be done through the Discord API. The `target_users_file` parameter accepts a CSV file containing Discord user IDs. Only users in that list can see and accept the invite.
**Example use cases:**
* Preventing invite sharing for exclusive achievements (for example, create a unique invite for a player with a 100% completion role)
* When combined with roles to give out mod/admin privileges
* Combined with roles to give special roles/channel access to paying supporters
These features work with all standard invite parameters like `max_age`, `max_uses`, and more.
***
## Role Granting Invite Example: Auto-Assigning Player Roles
In this example, we'll show you how to grant roles as part of an invite using the [channel invite API](/developers/resources/channel#create-channel-invite). We'll take a look at what a game developer could do to connect their game back to their Discord server.
### Prerequisites
Before you begin, make sure you have:
* A Discord server for testing
* Developer Mode enabled on your account (so you can copy role, channel, and user IDs)
* A Discord app with a bot token (create one in the [Developer Portal](https://discord.com/developers/applications))
* Node.js installed, or the ability to make HTTP requests from your bot or app
* Bot permissions for:
* **Create Instant Invite** (required to create invites)
* **Manage Roles** (required for automatic role assignment with `role_ids`)
### Coding the Invite
When players join your Discord server from your game, you can give them a **Player** role for access to game-specific channels. Here's how to create an invite that does this automatically:
```javascript theme={"system"}
// IMPORTANT: Never hardcode tokens or commit them to version control
// Use environment variables or a secure configuration management system
// Replace the placeholder below with your actual bot token, channel ID, and role ID
const BOT_TOKEN = 'REPLACE_WITH_YOUR_BOT_TOKEN_FROM_THE_DEV_PORTAL';
const CHANNEL_ID = '1234567890123456789';
const ROLE_ID = '9876543210987654321';
const response = await fetch(
`https://discord.com/api/v10/channels/${CHANNEL_ID}/invites`,
{
method: 'POST',
headers: {
'Authorization': `Bot ${BOT_TOKEN}`,
'Content-Type': 'application/json'
},
body: JSON.stringify({
role_ids: [ROLE_ID]
})
}
);
if (!response.ok) {
const error = await response.json().catch(() => ({
message: `HTTP ${response.status}`
}));
throw new Error(
`Failed to create invite: ${error.message}${error.code ? ` (code: ${error.code})` : ''}`
);
}
const invite = await response.json();
console.log(`Created invite: https://discord.gg/${invite.code}`);
```
### What's Happening
1. **`role_ids` array**: Contains the Discord role IDs to assign when the invite is accepted (we're only assigning one in this example, but you can assign any number of roles using this array)
2. **Response**: Returns an invite object with a `code` you can share
### Testing It Out
Create a **Player** role in your Discord server
Right click the role and click **"Copy Role ID"** then paste it in `ROLE_ID` in the script
Right click the channel for the invite and click **"Copy Channel ID"** then paste it in `CHANNEL_ID` in the script
Paste your bot token in `BOT_TOKEN` in the script
Run the code to generate an invite code
Share the `discord.gg/...` link with a test account
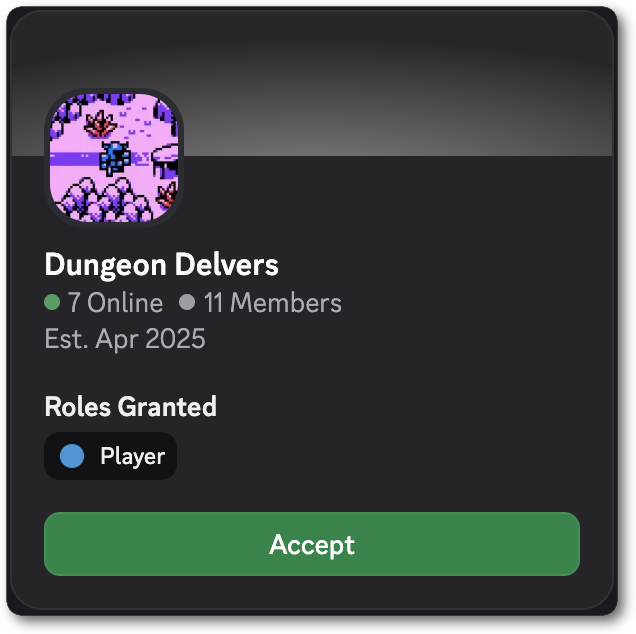
When they accept, they'll automatically get the **Player** role!
 ***
## Target Users Example: Creating Targeted Supporter Invites
In this example, we'll show you how to only allow specific users to accept an invite using the [channel invite API](/developers/resources/channel#create-channel-invite). We'll take a look at what a game developer or streamer could do to grant special roles and channels in their community for supporters.
### Prerequisites
Before you begin, make sure you have:
* A Discord server for testing
* Developer Mode enabled on your account (so you can copy role, channel, and user IDs)
* A Discord app with a bot token (create one in the [Developer Portal](https://discord.com/developers/applications))
* Node.js installed, or the ability to make HTTP requests from your bot or app
* Bot permissions for:
* **Create Instant Invite** (required to create invites)
* **Manage Guild** (required for targeted invites with `target_users_file`)
* **Manage Roles** (required for automatic role assignment with `role_ids`)
### Coding the Invite
If you run a subscription service for your game or community, you can create exclusive invites that only your paying supporters can accept. Those roles can grant access to channels that other users in the server can't see. Here's how to create an invite that grants a role to specific users:
```javascript theme={"system"}
// IMPORTANT: Never hardcode tokens or commit them to version control
// Use environment variables or a secure configuration management system
// Replace the placeholder below with your actual bot token, channel ID, and role ID
const BOT_TOKEN = "REPLACE_WITH_YOUR_BOT_TOKEN_FROM_THE_DEV_PORTAL";
const SUPPORTER_CHANNEL_ID = '1234567890123456789';
const SUPPORTER_ROLE_ID = '1111222233334444555';
// In production you would fetch this from your subscription database
// Replace these example user IDs with actual Discord user IDs of your test accounts
const activeSupporterIds = [
'111111111111111111',
'222222222222222222',
'333333333333333333',
];
// Create CSV content with user IDs
const csvContent = activeSupporterIds.join('\n');
const csvBlob = new Blob([csvContent], { type: 'text/csv' });
// Use FormData for multipart/form-data request
const formData = new FormData();
formData.append('target_users_file', csvBlob, 'supporters.csv');
formData.append('payload_json', JSON.stringify({
role_ids: [SUPPORTER_ROLE_ID]
}));
const response = await fetch(
`https://discord.com/api/v10/channels/${SUPPORTER_CHANNEL_ID}/invites`,
{
method: 'POST',
headers: {
'Authorization': `Bot ${BOT_TOKEN}`
},
body: formData
}
);
if (!response.ok) {
const error = await response.json().catch(() => ({
message: `HTTP ${response.status}`
}));
let errorMessage = `Failed to create invite: ${error.message || response.statusText}`;
if (error.code) {
errorMessage += ` (code: ${error.code})`;
}
if (error.errors) {
errorMessage += '\nDetailed errors:\n' + JSON.stringify(error.errors, null, 2);
}
throw new Error(errorMessage);
}
const invite = await response.json();
console.log(`Share this link with supporters: https://discord.gg/${invite.code}`);
```
### What's Happening
1. **`target_users_file`**: A CSV file containing Discord user IDs of paying supporters. Only these users can see and accept the invite.
2. **`role_ids` array**: Assigns the **Supporter** role automatically, giving them access to exclusive channels
3. **FormData**: Required when uploading files, the other parameters go in `payload_json`
When using only JSON parameters like `role_ids`, use `Content-Type: application/json`. When uploading `target_users_file`, you must use `multipart/form-data`.
### Setting Up the Supporter Role
For the best experience, configure your **Supporter** role with these permissions:
1. Create a **Supporter** role in your Discord server
2. Create a private channel (#supporter-polls or #supporter-chat)
3. Right click the channels and **"Edit Channel"** to set the channel permissions so only users with the **Supporter** role can view and message in it
* **View Channel** for the supporter exclusive channels
* **Send Messages** and **Add Reactions**
### Testing It Out
Create a **Supporter** role in your Discord server
Right click the role and click **"Copy Role ID"** then paste it in `SUPPORTER_ROLE_ID` in the script
Right click the channel for the invite and click **"Copy Channel ID"** then paste it in `SUPPORTER_CHANNEL_ID` in the script
Paste your bot token in `BOT_TOKEN` in the script
Right click each user you want to be able to accept the invite and click **"Copy User ID"** then paste that in `activeSupporterIds` in the script
Run the code to generate an invite code
Share the `discord.gg/...` link with one of the users you added to `activeSupporterIds` and one that you didn't
The users in `activeSupporterIds` will be able to accept and receive the **Supporter** role!
***
## Target Users Example: Creating Targeted Supporter Invites
In this example, we'll show you how to only allow specific users to accept an invite using the [channel invite API](/developers/resources/channel#create-channel-invite). We'll take a look at what a game developer or streamer could do to grant special roles and channels in their community for supporters.
### Prerequisites
Before you begin, make sure you have:
* A Discord server for testing
* Developer Mode enabled on your account (so you can copy role, channel, and user IDs)
* A Discord app with a bot token (create one in the [Developer Portal](https://discord.com/developers/applications))
* Node.js installed, or the ability to make HTTP requests from your bot or app
* Bot permissions for:
* **Create Instant Invite** (required to create invites)
* **Manage Guild** (required for targeted invites with `target_users_file`)
* **Manage Roles** (required for automatic role assignment with `role_ids`)
### Coding the Invite
If you run a subscription service for your game or community, you can create exclusive invites that only your paying supporters can accept. Those roles can grant access to channels that other users in the server can't see. Here's how to create an invite that grants a role to specific users:
```javascript theme={"system"}
// IMPORTANT: Never hardcode tokens or commit them to version control
// Use environment variables or a secure configuration management system
// Replace the placeholder below with your actual bot token, channel ID, and role ID
const BOT_TOKEN = "REPLACE_WITH_YOUR_BOT_TOKEN_FROM_THE_DEV_PORTAL";
const SUPPORTER_CHANNEL_ID = '1234567890123456789';
const SUPPORTER_ROLE_ID = '1111222233334444555';
// In production you would fetch this from your subscription database
// Replace these example user IDs with actual Discord user IDs of your test accounts
const activeSupporterIds = [
'111111111111111111',
'222222222222222222',
'333333333333333333',
];
// Create CSV content with user IDs
const csvContent = activeSupporterIds.join('\n');
const csvBlob = new Blob([csvContent], { type: 'text/csv' });
// Use FormData for multipart/form-data request
const formData = new FormData();
formData.append('target_users_file', csvBlob, 'supporters.csv');
formData.append('payload_json', JSON.stringify({
role_ids: [SUPPORTER_ROLE_ID]
}));
const response = await fetch(
`https://discord.com/api/v10/channels/${SUPPORTER_CHANNEL_ID}/invites`,
{
method: 'POST',
headers: {
'Authorization': `Bot ${BOT_TOKEN}`
},
body: formData
}
);
if (!response.ok) {
const error = await response.json().catch(() => ({
message: `HTTP ${response.status}`
}));
let errorMessage = `Failed to create invite: ${error.message || response.statusText}`;
if (error.code) {
errorMessage += ` (code: ${error.code})`;
}
if (error.errors) {
errorMessage += '\nDetailed errors:\n' + JSON.stringify(error.errors, null, 2);
}
throw new Error(errorMessage);
}
const invite = await response.json();
console.log(`Share this link with supporters: https://discord.gg/${invite.code}`);
```
### What's Happening
1. **`target_users_file`**: A CSV file containing Discord user IDs of paying supporters. Only these users can see and accept the invite.
2. **`role_ids` array**: Assigns the **Supporter** role automatically, giving them access to exclusive channels
3. **FormData**: Required when uploading files, the other parameters go in `payload_json`
When using only JSON parameters like `role_ids`, use `Content-Type: application/json`. When uploading `target_users_file`, you must use `multipart/form-data`.
### Setting Up the Supporter Role
For the best experience, configure your **Supporter** role with these permissions:
1. Create a **Supporter** role in your Discord server
2. Create a private channel (#supporter-polls or #supporter-chat)
3. Right click the channels and **"Edit Channel"** to set the channel permissions so only users with the **Supporter** role can view and message in it
* **View Channel** for the supporter exclusive channels
* **Send Messages** and **Add Reactions**
### Testing It Out
Create a **Supporter** role in your Discord server
Right click the role and click **"Copy Role ID"** then paste it in `SUPPORTER_ROLE_ID` in the script
Right click the channel for the invite and click **"Copy Channel ID"** then paste it in `SUPPORTER_CHANNEL_ID` in the script
Paste your bot token in `BOT_TOKEN` in the script
Right click each user you want to be able to accept the invite and click **"Copy User ID"** then paste that in `activeSupporterIds` in the script
Run the code to generate an invite code
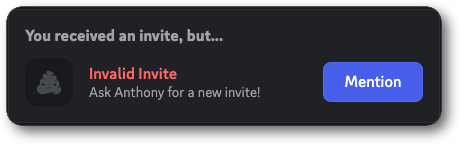
Share the `discord.gg/...` link with one of the users you added to `activeSupporterIds` and one that you didn't
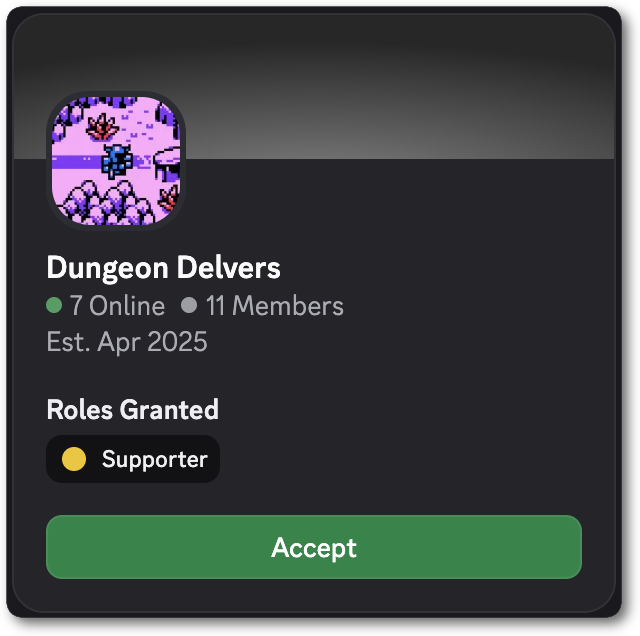
The users in `activeSupporterIds` will be able to accept and receive the **Supporter** role!
 ***
## Resources
For complete API reference details, check out the invite and channel API documentation.
Complete API reference for invite objects, endpoints, and parameters
Detailed documentation for the create invite endpoint
***
## Resources
For complete API reference details, check out the invite and channel API documentation.
Complete API reference for invite objects, endpoints, and parameters
Detailed documentation for the create invite endpoint