What Can Community Invites Do?
Community invites extend Discord’s standard invite system with two capabilities:Role Assignment
When someone accepts a community invite, Discord automatically assigns one or more roles to them. You can set this up directly in Discord’s UI or through the API. This is useful for:- Giving roles to supporters, beta testers, or players
- Granting access to specific channels based on a user’s status or subscription
- Automatically organizing new members without manual effort
Roles assigned through an invite persist even after the invite expires or is deleted. You’ll need to remove them manually via Discord’s interface or a bot.
Targeted Invites
Want to create an invite that only specific people can accept? Targeted invites let you restrict access to a list of specific Discord users — only those users will be able to see and accept the invite. This is an API-only feature. This is useful for:- Exclusive invites for paying supporters
- Controlled access for beta testers or event attendees
- Preventing invite sharing for special achievements or roles
Creating Role Invites in Discord
You can create role-assigning invites directly in Discord — no code required. This is perfect for server admins and community managers.Prerequisites
Before you begin, make sure you have:- A Discord server
- User permissions for Create Instant Invite, Manage Server, and Manage Roles
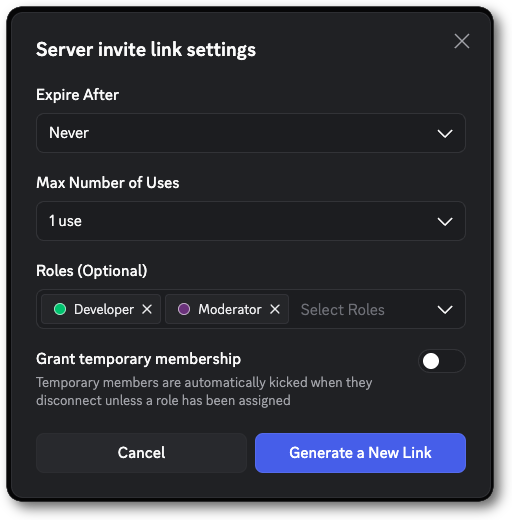
How to Create a Role Invite
- Open your Discord server and right-click the channel you want to create an invite for
- Select “Invite To Channel”
- Open your Discord server and click the server name
- Select “Invite To Server”
- Click “Edit invite link”
- Under “Roles (Optional)”, select one or more roles to auto-assign
- Configure other settings like expiration time and max uses
- Click “Generate a New Link”
- Share the invite link — anyone who accepts it will automatically receive the selected roles
Important Notes
- Users who accept the invite will receive the selected roles even if they’re already in your server
- Roles persist after the invite expires or is deleted
- You need Create Instant Invite and Manage Roles permissions to create role invites
- You can only assign roles that are lower than your highest role
For Developers
If you want to automate community invites in a bot or app — or use targeted invites — check out the developer tutorial.Using Community Invites (Tutorial)
Step-by-step API integration for bots and apps, including targeted invites and role assignment via the API
Create Channel Invite
API reference for the create invite endpoint